How to Take a Side Profile Physique Photo
Published
Quick answer
Here's how to take a side profile physique photo: turn perpendicular to the camera, pull your front shoulder back, brace your core, and shoot from chest height with light coming from the side. Refine the V-taper afterward in Chisel.
Key takeaways
- Turn your shoulder line a true ninety degrees from the camera, not a three-quarter angle.
- Shoot from chest height — higher flattens shoulders, lower squashes the torso.
- Light from the side carves the silhouette; front-on flash flattens it.
- Keep hips and shoulders turned together so the V-taper line stays clean.
- Chisel's Shoulders and Waist sliders refine the V-taper afterward, each with a natural limit.
Here's how to take a side profile physique photo that actually shows off a V-taper: turn your body so it's perpendicular to the camera, push your front shoulder back, and shoot from chest height with light hitting your side.
Why does a side profile photo show a V-taper better than a front shot?
A front-on photo hides most of the gap between your shoulders and your waist, because the camera is looking at width alone. Turn ninety degrees and that gap becomes the whole photo — the taper reads instantly, with no flexing or editing needed.
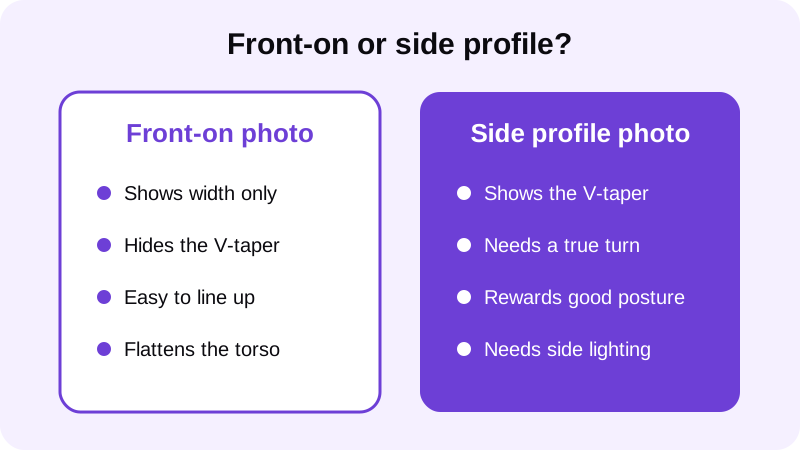
That's why a side profile is a staple pose in physique photography. The silhouette does the work a front shot can't — the same idea behind a side chest pose, just scaled down for a phone shot in a gym mirror or doorway.
It also forces a kind of honesty a front shot doesn't. There's nowhere to angle your torso to hide a slouch or exaggerate a taper that isn't backed up by your stance — the outline is the whole photo, so the posing and the camera setup have to do real work before any editing happens.
How do you take a side profile physique photo step by step?
The pose matters more than the camera here. Work through these steps in order and you'll get a usable shot in a handful of tries.
- Set the camera or phone at chest height, roughly level with your sternum.
- Stand so your shoulder line is perpendicular to the lens — a true side-on turn, not a three-quarter angle.
- Pull your front shoulder back and down instead of letting it round forward.
- Brace your core gently so your stomach doesn't push out past your chest line.
- Keep your front arm relaxed at your side rather than crossed over your torso.
- Take several shots while making tiny adjustments to the angle — a couple of degrees changes the whole silhouette.
Shoot more frames than feels necessary. A side profile pose is sensitive to tiny shifts — the exact amount your chin tilts, how far back your shoulder sits, whether your weight is on your front or back foot — and the only way to find the version that reads well is to compare a handful of near-identical shots afterward rather than trusting the first one.
What camera angle and lighting work best for a side profile shot?
Camera height changes the silhouette more than almost anything else in the shot. Shoot from above chest height and your shoulders look narrower than they are; shoot from below and your upper body looks compressed while your legs stretch out. Chest height keeps the proportions honest.
Distance matters too. Stand too close to the lens and a wide-angle phone camera will distort whichever part of your body is nearest it, usually stretching your chest or shoulder out of proportion with the rest of the frame. Back up a step or two and let the camera's natural field of view do the work instead of relying on digital zoom, which tends to soften detail.
Light from the side — a window, an open doorway, or a single lamp — carves a visible line along your chest and arm instead of flattening you into one flat tone. Front-on flash does the opposite: it blows out the rim that makes a side profile worth taking in the first place. For more on getting this part right, see our guide on best lighting for gym progress photos.
If you're shooting the full body rather than just the torso, the same chest-height rule applies, and it pairs well with the setup in how to take a full body photo that looks sharp. Keep your feet, hips and shoulders lined up along the same plane so the whole silhouette reads as one clean side-on shape rather than a twisted pose.
What mistakes make a side profile photo look off?
Most side profile photos fail for the same handful of reasons, and almost none of them have anything to do with your actual physique.
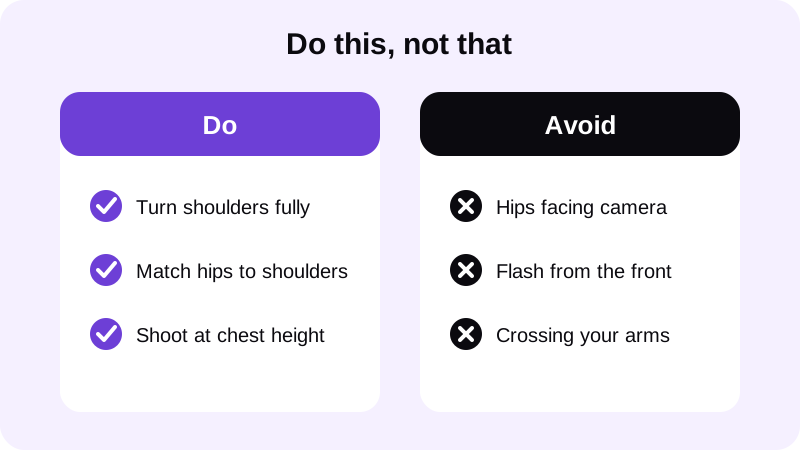
A second common issue is a dropped chin. Looking down at the camera to check the shot rounds your upper back and pulls your shoulder forward right as the photo is taken. Set the timer, look straight ahead at a fixed point, and let the shutter fire without glancing at the screen first.
Clothing can also work against you here. Loose fabric around the waist or a baggy shirt hem bunches up exactly where the silhouette needs to read clean, so a fitted top or no shirt at all usually photographs better for this particular angle than it would for a straight-on shot.
How do you refine a side profile photo naturally afterward?
Once you have a clean side profile shot, Chisel's Shoulders and Waist sliders build on the V-taper the pose already created. Shoulders widens the body at shoulder height, Waist slims it at the waist, and each one stops at a natural limit marked in green so the result still looks like you. The app's pose detection finds your torso automatically, even from a side angle, so there's nothing to mask by hand. For the full picture on tools that work with any gym shot, read our body editor for men guide, or our notes on how to widen shoulders in a photo if the taper still needs a touch more width.
If you want visible ab or chest definition on top of the pose, that comes from the optional AI Transform rather than the sliders. It sends the photo to a third-party cloud AI provider, asks first, and includes a limited number of free uses — see how to add a six-pack to a photo for the step-by-step. The rest of Chisel's manual tools, including Shoulders and Waist, run on your phone and stay separate from that cloud step.
When you're happy with the result, export in HD, or save the animated before/after reveal if you want to share the comparison instead of a single still. Chisel also writes an AI-altered label into the photo's metadata whenever the AI Transform is used, so anyone you share it with can see exactly which part of the image was edited that way.
Where else can you learn to edit a gym photo naturally?
FAQ
What camera height should I use for a side profile physique photo?
Set the camera at chest height, roughly level with your sternum. Shooting from above flattens your shoulders, and shooting from below squashes your upper body, so chest height keeps the silhouette's proportions honest and easiest to pose against.
Should my hips and shoulders both turn for a side profile photo?
Yes. Turning your shoulders but leaving your hips facing the camera is the most common mistake in a side profile shot — it breaks the clean V-taper line and makes the pose look like an awkward three-quarter angle instead of a true side profile.
Can Chisel edit a side profile photo the same way as a front-on shot?
Yes. Chisel's pose detection finds your torso automatically regardless of the angle, so the Shoulders and Waist sliders work the same way on a side profile photo, each stopping at a natural limit so the result still looks like you.
Does lighting matter more for a side profile photo than a front-on one?
It matters more. Side lighting creates the rim and shadow line along your chest and arm that sells the silhouette, while front-on flash flattens that same line. A window or single lamp placed to the side works better than overhead light.