How to Retouch a Gym Photo Realistically
Published
Quick answer
To retouch a gym photo realistically, fix the shot and lighting first, shape the torso with small slider moves inside the natural limit, and save any six-pack or muscle definition for last with AI Transform.
Key takeaways
- Fix lighting and angle before you open any editing tool — no slider fixes a flat shot
- Shape the V-taper with the Shoulders and Waist sliders before adding any fullness
- Stop every slider at the green natural limit so the result still looks like you
- Save six-pack and muscle definition for AI Transform, used after the shape is set
- Export in HD or use the animated before/after reveal when sharing the result
Retouching a gym photo realistically means fixing small things, not reinventing your physique. Here's how to retouch a gym photo realistically so the result still looks like you walked out of the gym, not out of an app.
What makes a gym photo retouch look fake?
Most retouching mistakes come from the edit doing too much work. If the shot is flat and the lighting is even across the whole frame, no slider or filter can fix that afterward — pushing the Abs or Muscle slider past the point the photo actually supports is what makes an edit read as obviously altered. The other common giveaway is mismatched lighting: skin that's been smoothed in one area while a gym mirror glare or shadow still sits untouched everywhere else.
A realistic retouch starts before you open any editing tool. Good lighting for gym progress photos and a clean, consistent angle do more for believability than any amount of editing afterward. Subtle gym photo editing tips almost always start with the camera, not the app — a flat, head-on shot under harsh overhead light gives any editor less to work with than a photo taken at a slight angle near a window.
Common gym photo retouching mistakes to avoid include smoothing only part of the frame, widening the shoulders without touching the waist, and adding definition before the torso shape is even settled. Each of these is easy to spot once you know what to look for, and each one is avoidable by slowing down and working through the photo in order, start to finish.
What's the right order to retouch a gym photo?
Work in this order: fix the shot, shape the torso, add definition last, then export. Doing it in reverse — trying to define abs on a photo that's still poorly lit or poorly posed — is usually how a realistic physique photo edit falls apart before it even gets started.
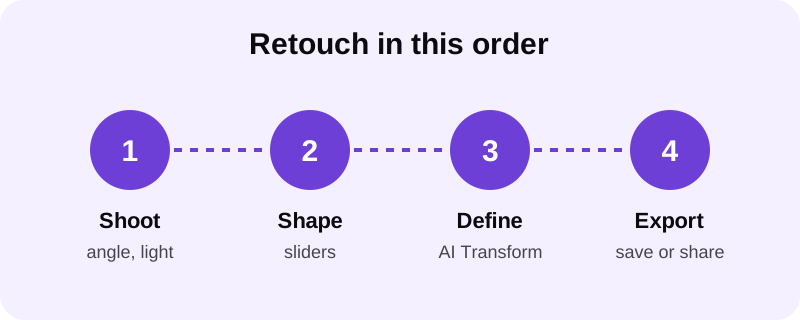
- Start with a photo where your torso is clearly visible, shirtless or in a fitted top, so pose detection can find it automatically with no manual masking needed.
- Check the lighting is even across your chest and stomach before editing — an uneven light source will show through any later edit, no matter how careful it is.
- Open the Shoulders and Waist sliders to build the V-taper, stopping each one at the natural limit marked in green rather than pushing toward it.
- Nudge the Abs or Muscle slider for a touch of fullness through the middle of the torso — the two sliders apply the same gentle effect, so use whichever feels more intuitive.
- If you want six-pack or muscle definition, run AI Transform once the shape of the torso is already set, not before.
- Export the photo in HD, or save the animated before/after reveal if you're sharing the edit as a comparison.
How do you keep the sliders from looking exaggerated?
Every slider in Chisel carries a natural limit marked in green — the point past which the result stops looking like the person in the original photo. Treat that line as a hard stop rather than a target to approach. The Shoulders and Waist sliders build the V-taper together, so moving one without the other is usually what tips an edit from subtle into obviously shaped.
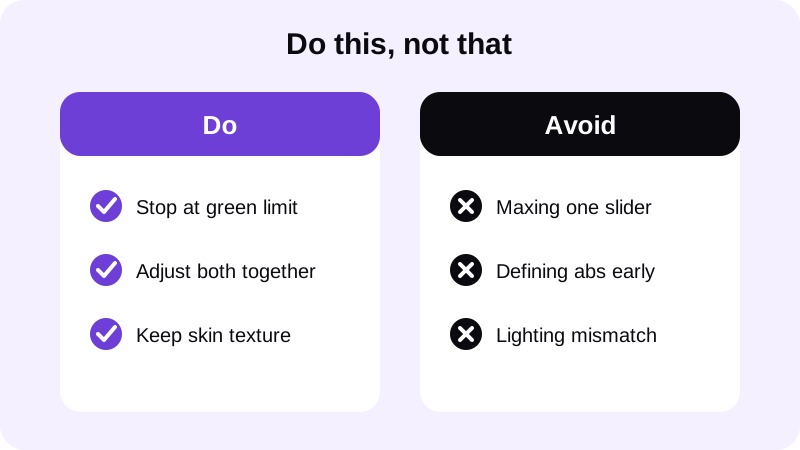
It helps to zoom out and check the whole silhouette rather than watching a single slider move in isolation. A V-taper that looks right up close can still look odd at full-body scale if the waist hasn't moved in step with the shoulders. Take a short break between adjustments and come back with fresh eyes — the natural limit marked in green exists precisely so you don't have to guess where that point sits.
If your main concern is a belly or waist area rather than overall shape, it's worth reading through the dedicated guide on how to hide belly fat in photos, since camera angle alone solves a lot of what the Waist slider would otherwise need to fix.
When should you use AI Transform for muscle definition?
Six-pack abs and chest, shoulder and arm definition don't come from the sliders at all — the Abs and Muscle sliders only add a gentle, even fullness to the middle of the torso. Actual definition comes from the optional AI Transform, which asks first, sends that single photo to a third-party cloud provider, and includes a limited number of free uses. It aims to keep your face, pose and background unchanged while adding the definition itself, so the rest of the photo should still look like the one you started with.
Because AI Transform changes the photo noticeably, it's the step most likely to look wrong if it's rushed. The guides on how to add a six-pack to a photo and how to add muscle to a photo that still looks real go into more detail on getting that step right. Chisel also writes an AI-altered label into the photo's metadata whenever AI Transform is used, which is worth knowing if you plan to share the result anywhere people might ask about it.
How do you finish and share the retouch?
Once the shape and any definition are set, export. Chisel exports an edited photo in HD, and photos larger than a certain size on the long side get scaled down slightly on import, so starting from a reasonably sized file keeps the most detail in the final export. If you're posting a progress comparison rather than a single shot, the animated before/after reveal is built for exactly that — it's a sharing format, not a promise about what any future photo will look like.
If you're building a longer series of progress photos rather than a single retouched shot, it helps to keep your setup consistent from one session to the next — roughly the same angle, the same lighting, the same framing. A consistent starting photo means the edits you apply afterward can stay small and believable instead of having to compensate for a shot that changed every time. Consistency in the original photo is what ultimately lets a retouch stay subtle rather than heavy-handed.
A realistic retouch is really a chain of small, honest decisions: a shot worth editing, a shape that respects the natural limit, and definition that's added last and disclosed honestly. Get those three right, in that order, and the retouch stops being something anyone notices at all — it just looks like a good photo of you.
- Body editor for men: how to edit gym photos without looking fake
- How to make a transformation photo believable
- How to widen shoulders in a photo (naturally)
FAQ
What's the biggest mistake people make retouching a gym photo?
Editing the torso before fixing the shot. Pushing the Abs, Muscle, Shoulders or Waist slider on a poorly lit, flat-angle photo makes the edit obvious, because the lighting and proportions were already working against it.
Can Chisel retouch my face too?
No. Chisel only edits the body — the Abs, Muscle, Waist and Shoulders sliders, plus a whole-photo Smooth filter. It has no jawline, eye, teeth or beard edits, so face retouching isn't part of the app.
How do I know if I've overdone a retouch?
Check the slider against its natural limit, marked in green. If you've pushed past it, or the silhouette looks exaggerated when you zoom out, the retouch has gone further than the photo supports.
Does retouching a gym photo require an account or upload my data somewhere?
Chisel requires no account. Manual sliders run on your phone; only the optional AI Transform sends your photo to a third-party cloud provider, and it asks first before doing so.