How to Make a Transformation Photo Believable
Published
Quick answer
A transformation photo becomes believable when the before and after match in camera angle, lighting and pose, and the edit stays within Chisel's natural limit. That is how to make a transformation photo believable without it looking staged.
Key takeaways
- Match camera distance, angle and pose in both photos before editing anything.
- Keep lighting consistent, or even it out with the same Relight preset on both photos.
- Stop each slider at its green natural limit so the after photo still looks like you.
- Use AI Transform sparingly for six-pack or muscle definition, matching the before photo's build.
- Share with the animated before/after reveal; Chisel labels AI edits in the photo's metadata.
A transformation photo only looks convincing if nothing about it reads as mismatched. Here's how to make a transformation photo believable, from the shot itself to the edit you put on top of it.
What makes a transformation photo look fake?
Most "after" photos fall apart for the same handful of reasons: the lighting doesn't match the "before," the camera sits at a different distance, or the edit pushes past what the body in the shot could plausibly look like. A viewer's eye goes to the relationship between the two photos first and the edit second, so inconsistency gets noticed long before anything about the edit does.
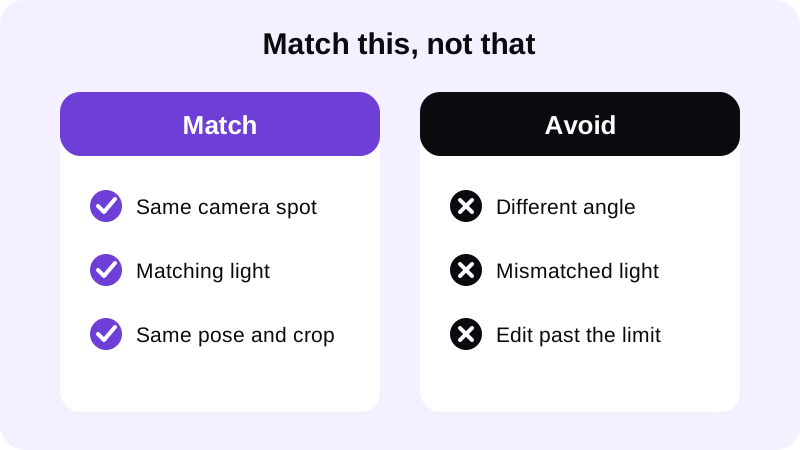
The giveaways are usually small and they compound fast. A believable before and after photo avoids all of them at once, not just one or two:
- A different time of day, so the shadows fall a different way in each shot.
- A tighter crop or a closer camera in the "after," which changes proportions on its own.
- Muscle or ab definition that doesn't match the leanness the rest of the photo shows.
- A background, outfit or mirror that quietly gives away a different session entirely.
- Posting two photos taken far apart without saying so, which undermines trust even when the edit itself was honest.
These are the transformation photo editing mistakes that show up again and again, and almost none of them involve the edit itself — they happen at the camera, long before any slider gets touched.
How do you keep the before and after consistent?
Consistency does most of the work before you ever open an editor. A consistent transformation photo setup makes the edit afterward barely necessary, because the two photos already agree with each other.
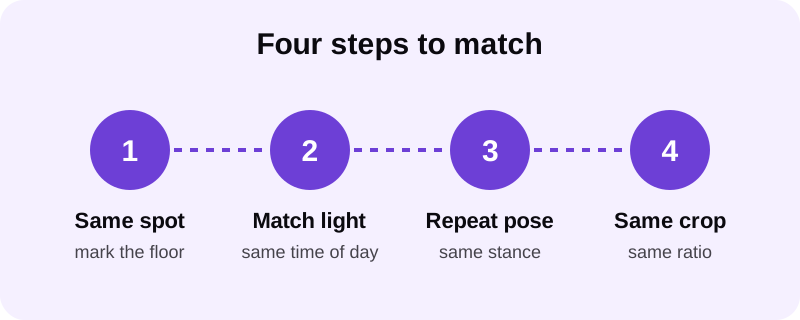
- Shoot both photos from the same spot, at the same distance from the camera, so the frame lines up edge to edge.
- Use the same light source at roughly the same time of day — natural window light or an even gym light both work, as long as the setup repeats.
- Repeat the same stance, the same arm position and the same amount of flex, or none at all, in both photos.
- Crop both photos to the same aspect ratio before you compare or edit them, so neither one is secretly zoomed in.
If the lighting still looks slightly different once both photos sit side by side, a one-tap Relight preset — Studio, Soft, Warm or Dramatic — applied to both photos can even out brightness and contrast between them. It only adjusts tone, not the direction light falls from, so it works best when the original setup was already close. For more on getting the shot itself right, see our guides on best lighting for gym progress photos and how to take a before and after photo.
How do you edit the after photo without overdoing it?
Once the two shots match, edit the "after" the way you'd edit any single photo: in small steps, checking the result as you go rather than dragging every slider to its end.
Start with the sliders, not the AI
Chisel's Shoulders and Waist sliders build the V-taper — Shoulders widens the frame at shoulder height and Waist slims it in. The Abs and Muscle sliders both add the same gentle fullness to the middle of the torso rather than drawing in lines or a six-pack. Chisel's pose detection finds the torso automatically, so this works on a shirtless photo or a fitted top with no manual masking needed.
Add definition with AI Transform, sparingly
Visible six-pack or muscle definition comes from the optional AI Transform. It asks first, sends that one photo to a third-party cloud provider, and includes a limited number of free uses. The result aims to keep your face, pose and background unchanged. See our full guides on adding a six-pack to a photo and adding muscle to a photo for the step-by-step process.
Leave the Height slider out of it
The Height slider stretches the whole photo vertically from its centre and trims the top and bottom edges — it doesn't lengthen the legs on their own. Using it on only one of the two photos will throw off the comparison instantly, so if you use it at all, apply the exact same value to both.
Read more about how the sliders and AI Transform work together in what Chisel AI is and how it works.
How do you share a transformation photo honestly?
Once you're happy with both photos, how you present them matters almost as much as how you edited them.
Chisel can export an animated before/after reveal built for sharing, so viewers see the same two photos you compared rather than a static split image. Any AI-edited photo also gets an AI-altered label written into its metadata, which is what honest transformation photo sharing actually looks like — the edit is disclosed instead of hidden. Pro removes ads and the watermark and unlocks Pro templates, with a one-time Lifetime purchase available if you'd rather not subscribe to Pro, and no account is required either way. Photos export in HD, and Chisel is available on Android now, with an iPhone version coming soon.
For a wider look at editing gym photos without overdoing it, see our guide on body editor for men.
A transformation photo doesn't need a dramatic edit to be believable. It needs a matching setup and an edit that respects it — get those two things right and the comparison holds up to a second look, even from someone who's looking for the seams.
FAQ
What's the biggest giveaway that a transformation photo is fake?
Mismatched lighting or a different camera angle between the two photos, not an exaggerated edit. People compare the two shots first, so a different shadow direction or a tighter crop in the after photo stands out faster than any slider move does.
Should the before and after use the exact same pose?
Yes. Repeating the same stance, arm position and amount of flex in both photos removes one of the biggest variables. If the pose changes along with the body, viewers assume the photo changed too, which undercuts the comparison.
How far can I push the edit before it looks unrealistic?
Every Chisel slider shows a natural limit marked in green, built to keep the result looking like the person in the photo. Staying inside that limit on the Shoulders, Waist, Abs and Muscle sliders keeps a transformation photo believable.
Does Chisel disclose when a photo has been edited with AI?
Yes. Any photo edited with AI Transform gets an AI-altered label written into its metadata, so the edit is disclosed rather than hidden. The animated before/after reveal can also show both photos together for honest sharing.
Can I use AI Transform on only the after photo?
Yes. AI Transform asks first, sends that one photo to a third-party cloud provider, and includes a limited number of free uses. Keep the added definition close to what the before photo's build could plausibly grow into.