How to Take a Back Muscle Photo
Published
Quick answer
To take a back muscle photo, angle the camera at mid-back height, turn a quarter toward a side light, and raise your arms slightly for a lat spread. That's how to take a back muscle photo that shows real shadow and shape, not a flat silhouette.
Key takeaways
- Side (raking) light creates the shadow lines that make back muscle visible in a photo.
- Shoot from mid-back height with a quarter turn — not from above or dead-on.
- Step back and zoom in instead of shooting close with a wide lens.
- Chisel's Shoulders and Waist sliders sharpen the V-taper, each with a natural limit.
- Chisel has no back slider — the back's definition comes from pose and light, not an edit.
Knowing how to take a back muscle photo starts with camera angle and light, not an editing app. This guide covers the pose, the lighting, and the small edits that finish the shot without faking anything.
What camera angle shows back muscle best?
A back muscle photo reads best when the camera sits around mid-back height, not above your head and not flat at floor level. Shooting from above flattens the shoulders and lats, and shooting too low exaggerates the lower back instead of showing the full shape.
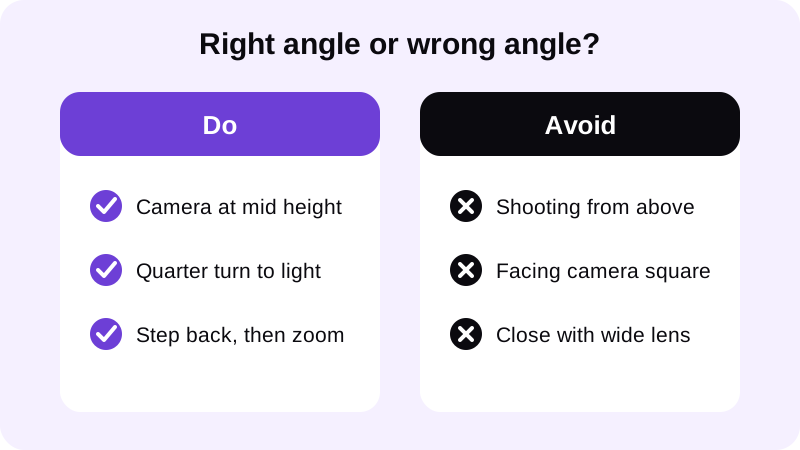
Turn about a quarter away from the camera so one side of your back catches the light and the other falls into shadow — that contrast is what actually separates the muscle groups in a photo. A pure front-on or pure back-on shot looks flat no matter how carefully the light is set up.
Step back a few extra feet and zoom in slightly rather than shooting close with a wide lens. Up close, a wide-angle lens stretches whatever is nearest the camera, usually the shoulder closest to the lens, which throws off the proportions you're trying to show.
Keep the background plain and the clothing simple. A cluttered gym behind you competes with the muscle detail you're trying to capture, and a patterned shirt or a tank top covered in text pulls the eye away from the shape of your back.
How do you pose and light a back muscle photo step by step?
The setup matters more than the camera here. Follow roughly the same order each time so your shots stay consistent enough to compare side by side later.
- Set the main light source to one side of you, roughly level with your shoulders, not overhead.
- Stand with your back to the camera and turn a quarter turn toward the light.
- Raise your arms slightly out from your sides to open up a lat spread.
- Pull your shoulders back and down so your upper back doesn't round forward.
- Have someone else take the shot, or use a timer and a stand — a mirror selfie won't work here.
- Check the preview before you move: look for a visible shadow line down the centre of your back, not a flat, evenly lit surface.
What lighting setup brings out the back muscles?
Side light, often called raking light, is what creates the shadow lines that make a back look defined in a photo. Light that hits the back from straight in front or directly overhead spreads evenly across the skin and erases the grooves between muscle groups.
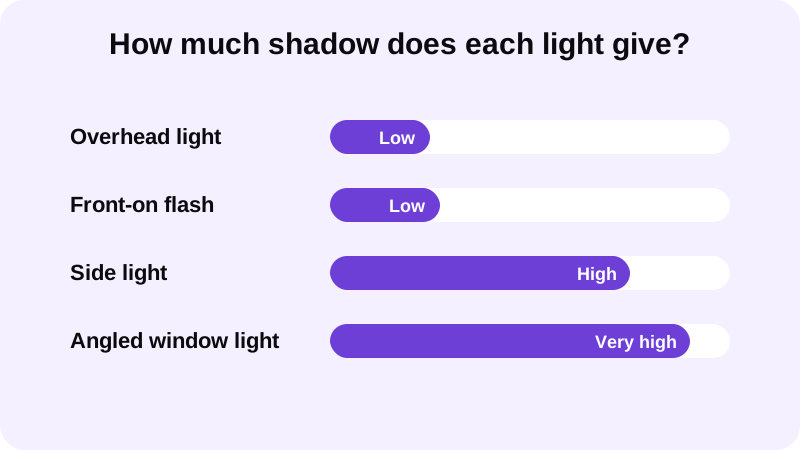
Natural window light angled from one side works well for this, and so does a single lamp placed off to the side rather than a ring light or an on-camera flash pointed straight at you. For more on getting consistent light across a whole gym photo, see our guide to lighting for gym progress photos.
If you're shooting outdoors, early morning or late afternoon light coming in low from one side works the same way as an indoor side lamp — it's the angle of the light that matters, not whether it's natural or artificial.
How do you edit a back muscle photo without faking it?
Chisel doesn't have a back or lat slider, so the muscle definition in a back photo has to come from the pose and light above, not from an edit. What Chisel can do afterward is clean up the overall shape and the shot itself.
The Shoulders and Waist sliders build the V-taper by widening the body at shoulder height and slimming it at the waist, and that taper reads just as clearly from behind as it does from the front. Each slider stops at a natural limit marked in green, so the result still looks like your actual frame. For the fuller version of how the sliders work together, see our guide on how to add muscle to a photo that looks real.
The Height slider stretches the whole photo vertically from the centre and trims the top and bottom edges, which can tighten up a back shot that was framed a little too wide. The Smooth filter smooths the whole photo evenly — it isn't a skin or face tool, so use it lightly if you want to soften harsh gym lighting without losing the shadow lines you just set up.
Chisel also has a background remover that cuts you out as a transparent image, useful if you want to drop the shot onto a plain background, and four one-tap Relight presets — Studio, Soft, Warm and Dramatic — that adjust brightness and contrast if the original light came out flat. None of this replaces getting the side light right in the first place; it just cleans up what you already shot. For more on building a believable V-taper across a full set of gym photos, see our body editor guide for men.
If you want to share a sequence of back shots over time, Chisel can export an animated before/after reveal for the post, and it writes an AI-altered label into a photo's metadata whenever AI Transform is used, so edits stay disclosed.
Every slider and tool in Chisel, including these, is free to use. Chisel Pro removes ads and the watermark and unlocks Pro templates, and it includes a short free trial if you want to try it before deciding, with a one-time Lifetime purchase available as an alternative to subscribing.
Get the angle and the light right first. The sliders and filters afterward are there to tidy up proportions and tone, not to invent muscle that the photo doesn't already show.
FAQ
Can Chisel add muscle definition to a back photo?
No. Chisel's AI Transform adds six-pack and chest, shoulder and arm definition to the front of the torso, and Chisel has no back or lat slider. For a back photo, the muscle definition has to come from your pose and the side lighting, not an edit.
What's the best pose for a back muscle photo?
Turn about a quarter away from the camera, raise your arms slightly from your sides, and pull your shoulders back and down. This opens up a lat spread and keeps your upper back from rounding forward, which reads better than a flat, square-on stance.
Should I use a flash for a back muscle photo?
Avoid pointing a flash or ring light straight at your back — it flattens the shadows that define the muscle groups. A single light source placed off to one side, like a window or a lamp, creates the raking light that actually shows shape.
Why does my back look flat in photos even with good light?
It's usually the angle, not the light. Shooting from directly behind at eye level, or from above, spreads light evenly across your back. Move the camera to roughly mid-back height and turn slightly to one side instead.
Can I take a back muscle photo as a selfie?
Not really — you can't frame your own back in a mirror the way you can a front shot. Use a timer on a stand or ask someone else to take it so you can control the angle and light properly.